

Highlighting and Contouring
Posted January 27, 2014 by Prairie Wife - 2 comments
If you have spent any amount of time on Pinterest over the last year, I guarantee that you have heard of highlighting. Most of us have seen that picture of a beautiful model or celebrity with streaks of white and dark brown makeup all over her face. Followed by an after picture where her already chiseled cheekbones look even more sculpted, and her eyes look as crisp and clear as a Spring morning (cue the birdsong). Whatever…I could look like that too if I had a professional styling team and a night nanny! But, I’ve been reading all about it in my magazines, forget articles on “how to do the smoky eye”, now it’s all about highlighting. As I have started following more and more style blogs (once you start it is very addicting so beware) I’ve been exposed to more and more YouTube videos, and I admit it, I’ve been sucked in. I mean how great would it be, if all I needed to finally start that lucrative modeling career (this is a joke BTW) is a little bit of highlighting?
So I gave into the hype and hit Pinterest on a mission, to find the best and easiest highlighting tutorial. After hours of looking (thank God for Playhouse Disney) I found one at hairsprayandhighheels.net which is now one of my favorite blogs to check in on every week! Angela Peters did exactly what I’m doing, she saw a “how to” video that she liked and tried it and then wrote about it for her readers. Which I obviously support, I mean really why reinvent the wheel? Plus the makeup items she used are all available at your local drugstore, which means I could afford to give it a try, and I could simply pick up the items when I ran errands that week.
Flawless Face: Subtle Highlight + Contour Tutorial
I watched the video twice, then went out to buy my supplies. I chose a lighter Maybelline FIT Me Shine Free Foundation color than recommended, for my contouring, because I fell like I am pale, pale…pale. I already had a highlighter of my own and matte powder (I’ll list what I used below). I got home and waited until the Cowkids and Cowbaby went to bed. I watched the video yet again and then headed to the bathroom. I took a before selfie and got to work. It was relatively easy to do, though of course more time consuming than my normal date night makeup routine. I took an after selfie and compared the two. I couldn’t see a thing different, other than my makeup looked a little thicker than usual, which is not what I was going for. It was actually, all things considered an epic fail. All the time and money, and no chiseled cheekbones or youthful eyes!
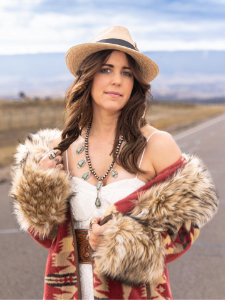
Being a Prairie Wife I don’t give up easily, so I watched the video again. I decided that maybe I had been a little too cautious in getting my defining color, and obviously I needed some help. I called my go to girl TallGirlJ, invited her over for dinner and some makeup experimenting and hit the drug store again for some darker makeup. This time it was way more fun, we were giggling like teenagers as we did the makeup, even our daughters were laughing right along with us. And the results were way better. Especially when we got out of the harsh bathroom lights and into the real world. Then the difference was obvious. I mean let’s be honest, we weren’t suddenly going to be mistaken for Kim Kardashian or anything, but we did look more polished. It moved our normal date night look from subtle to sophisticated. That first night it probably added an extra 5 minutes to my regular date night makeup routine. Now that I have a little practice it has barley added a minute!
I did a few things differently than the video and blog recommended. I used a few different products than they did, mostly because I already had the same basic product, just a different brand (see the list below). I started out by doing my regular prep and primer routine and used my normal foundation rather than the product she recommends. Watch the video at least twice before you try it! I have noticed that you definitely have to make sure you do heavier eye makeup with this look, or you tend to look a little washed out. I used my highlighter powder and lightly layered it over the other makeup; under my eyebrows, the inner corner of my eyes, and on top of my cheekbones. TallGirlJ has added just the highlighter tricks to her everyday makeup routine and it makes her look fresh and amazing! Make sure you take a look at yourself in natural or “normal” light to make sure it is all blended correctly, and that you have the look you want. I say give this a try, but practice these makeup tricks a few times before you head out on date night with it!
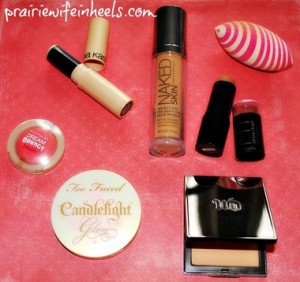
From Left to Right and Top to Bottom
Highlighter-Sonia Kashuk Chic Luminosity Highlighter Stick in Sparkling Sands, Target
Foundation– Urban Decay Naked Skin Weightless Ultra Definition Liquid Makeup in Shade 5.0, Ulta.com
Makeup Sponge-SOHO Beauty Sponge, Walmart
Blush– Maybelline Dream Bouncy Blush in Peach Satin, Walmart (I have to add that this is the most amazing product and color EVER)
Contouring– Maybelline FIT Me Shine-free Foundation in Toffee Caramel, Walmart
Highlighting Powder– Two Faced Candlelight Glow Highlighting Powder Duo, Ulta.com
Finishing Powder– Naked Skin Ultra Definition Pressed Finishing Powder in Medium, Ulta.com
Have you tried highlighting and contouring? How did it work for you?
Categories: Prairie Wife Style
Tags: , Beauty, contouring, date night look, highlighting, Makeup tips
Previous Post « Winner of the YOU PICK Prairie Wife of the Week, Feb 2014
Next Post How to NOT Nurse Your Baby »

2 thoughts on "Highlighting and Contouring"