


Get Your Schedule Organized for Under $50
Posted August 29, 2015 by Prairie Wife -
School is about to start and for many of us moms it’s time to pull yourself together and get back on the organization train. There is something about this time of year that makes me want to sharpen my pencils and straighten up my own desk. Maybe it’s the Cowkids and their fresh school supplies, or perhaps it’s the fact that we suddenly need to stick to a schedule, and it’s up to me to make sure that everyone gets where they belong on time (and on the right day).
When Fall rolled around two years ago I decided to put together an organization corner in our kitchen (the hub of our house). Like every other sane person I first went to Pinterest and pinned the heck out of all the ideas I loved. Then I showed The Cowboy all my great ideas…and after he got done laughing he said no way was he building shelves or putting 50 holes in our wall. He seemed to think that my organization kick would be short lived. I went ahead and ignored him and with a lot of nagging and threatening to just do it myself, he finally relented and agreed to help me do a scaled down (more realistic) organization corner. Everything I did cost under $50 and only took me 30 minutes to create, keep in mind this doesn’t include drying time.
 Two years later I have to say that I love what we’ve done. Not only is it 100% effective but, what I created has truly made our lives easier. For the sake of honesty and sticking to our PrairieWifeInHeels.com guarantee I decided to leave our corner looking how it truly is. I resisted the urge to purge and make it look like I remembered to file away all the kids papers from the last school year (I’ll get to it next week I swear)!
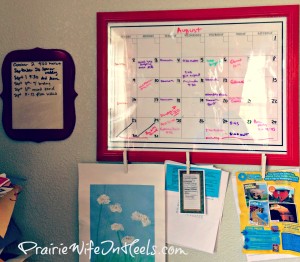
As you can see, my organization corner takes up a minimal amount of space and is easily accessible both physically and visually. This is really important. Take some time to think about the best spot to put your corner. If you have younger Cowkids like me, make sure you put it up high where their sweat little fingers can’t smudge your calendar.
 Supplies
1 large frame (with glass)
1 large self adhesive calendar (month view)
1 8×10 picture frame (with glass)
1 8×10 piece of paper (pattern or white)
3 wooden clothes pins
Super Glue
Spray Paint (if desired)
White board markers
2 sets of hanging magazine racks
1. Make sure that you know the measurement of your self adhesive calendar and make sure it will fit inside the large frame that you picked.
2. Paint your two frames to match your decor. You may not need to do this step if you found frames that match.
3. Once paint on frame is dry (and on the clothes pins if you painted them) put super glue on the bottom of the clothes pins and glue them evenly around the frame. If you need more than three you can glue them on the sides as well. I use these for all the things I need to see…to do lists, and permission slips are right in my face, it keeps me from forgetting to take care of them!
4. Place the self adhesive calendar in the frame and hang it up in an easily accessible area. Using white board markers on the glass fill in your calendar and enjoy being the most organized mom ever!
5. Place your paper in the 8×10 frame. I used white because it went best with my decor but a patterned paper is a great way to bring color and texture into your decor! Hang up your frame and use it for adding dates to remember for the next few months. I also use this to put up important phone numbers for our babysitter.
6. Hang up your magazine racks and assign each kid a spot. It’s a great way to keep their keepsake papers and pictures “organized”. As soon as the Cowkids walk in the door they empty backpacks and we immediately throw away what isn’t necessary or worthy of saving, and put the other papers where they belong. I also have a shelf for The Cowboy where he keeps all of his mail and important papers.
How do you stay organized?
Categories: For the Home, Prairie Wife Style
Tags: , calendar, calendar corner, DIY, DIY organization, motherhood, organization, parenting, school organization, tips and tricks for school age children
Previous Post « So Long Summer
Next Post My New Reality »